

Introduction:
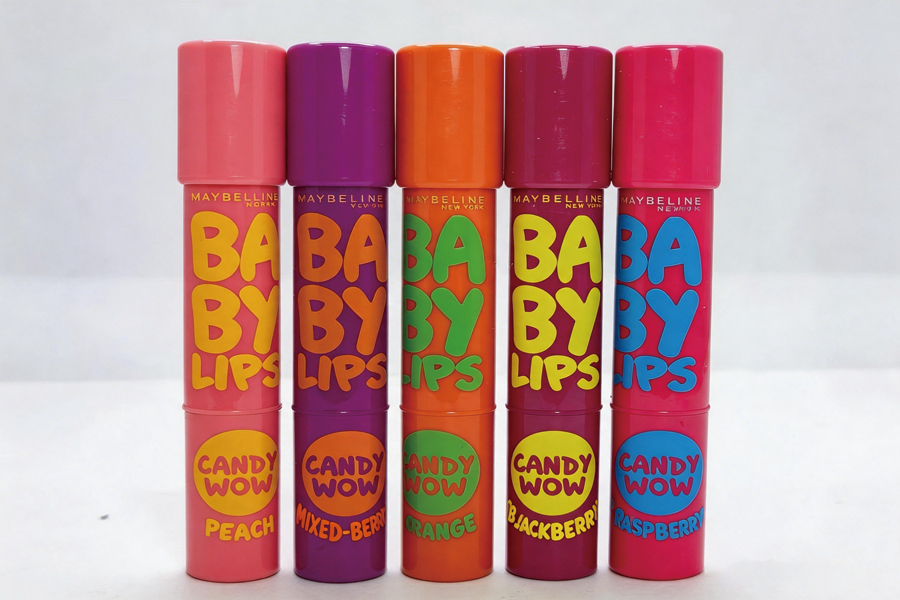
In the realm of cosmetic packaging surface decoration, heat transfer printing is a highly favored process among brand owners. Its popularity stems from its exceptional printing convenience and the ability to customize intricate, multi-colored designs. However, the heat transfer printing process frequently encounters specific quality control challenges.
This comprehensive guide breaks down the core principles of heat transfer printing, the key factors that influence its success, and actionable troubleshooting solutions for common quality defects. This serves as an authoritative reference for procurement and quality control professionals within the premium cosmetic packaging supply chain.
PART 1: What is Heat Transfer Printing?
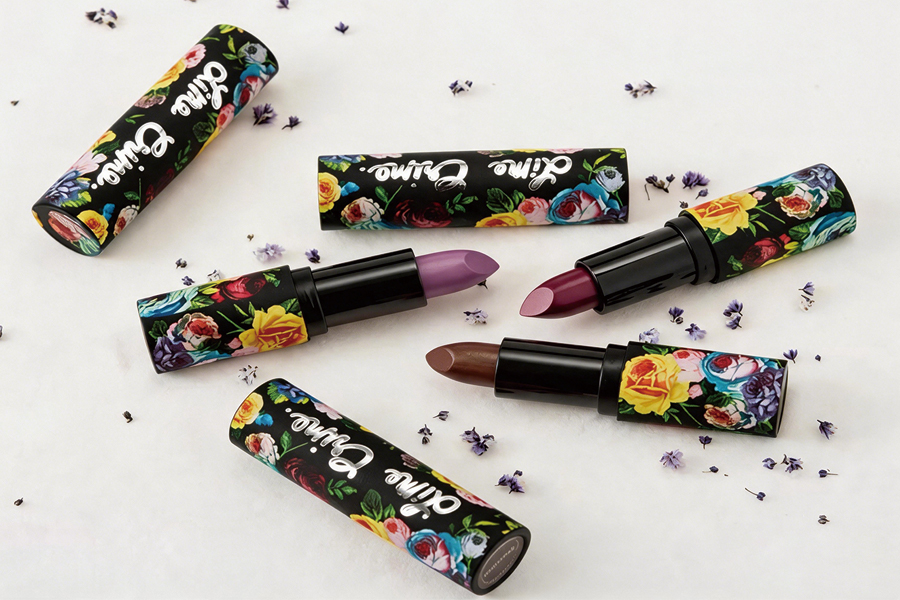
Heat transfer printing is a decoration technique that uses a transfer medium (typically a specialized paper or film) coated with pigments or dyes. Through the precise application of heat and pressure, the decorative ink layer is transferred from the medium onto the surface of the substrate (the packaging container).
The fundamental principle involves placing the ink-coated medium in direct contact with the substrate. Under the heat and pressure generated by a thermal print head and an impression cylinder, the ink on the transfer medium melts and successfully bonds to the substrate, resulting in the final decorated product.
PART 2: Key Factors Influencing Heat Transfer Printing
1. The Thermal Print Head
The thermal print head primarily consists of a surface film protection layer, a bottom film protection layer, and a heating element. The heating element acts as a conductive woven mesh screen. Using heat generated by voltage pulses and thermal diffusion, the coarse particles of the ink layer in the graphic areas are raised, melted, and transferred.
The speed of heat transfer printing depends on the time required to print each line of the graphic. Therefore, excellent thermal conductivity between the print head and the transfer paper is critical. This ensures the heat generated rapidly passes through the protective layer, the transfer substrate, and the air gaps to reach the packaging surface, granting the ink sufficient time to transfer completely.
2. The Ink Composition
Heat transfer ink is generally composed of three main elements: pigments (or dyes), waxes, and oils. Among these, wax is the primary carrying component.
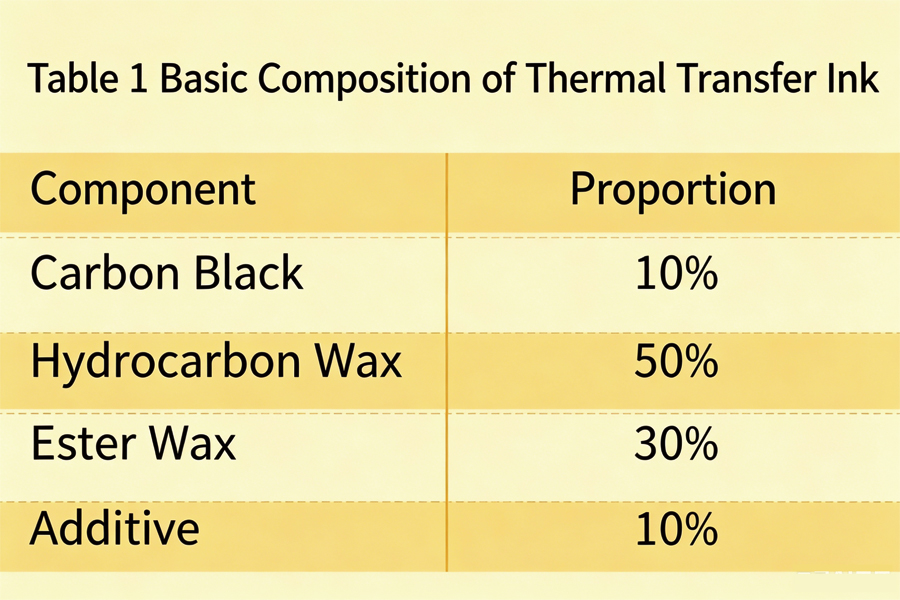
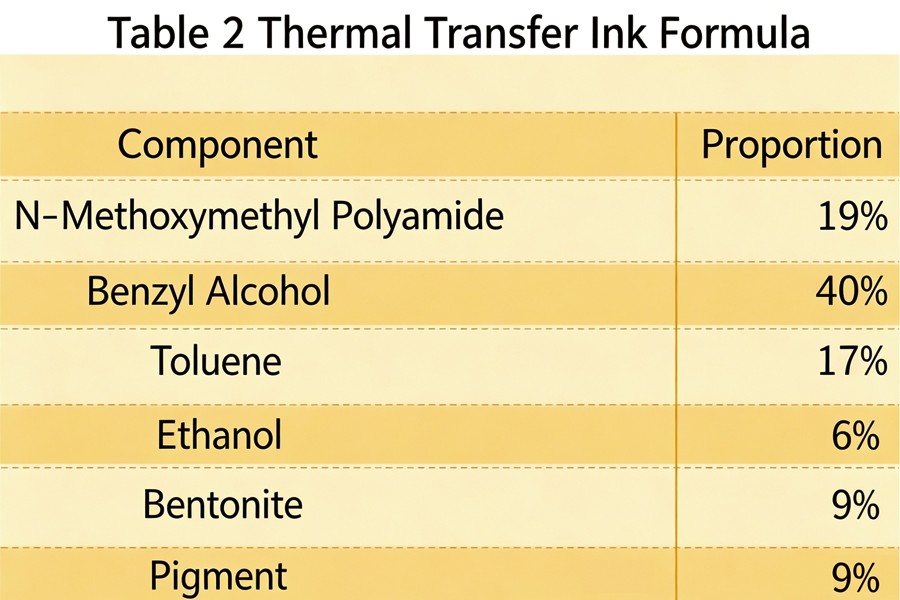
Formulation Example: In a typical screen-printing heat transfer ink formula, N-methoxymethyl polyamide is dissolved in solvents like benzyl alcohol, toluene, and ethanol. Heat-resistant pigments and bentonite are added and stirred, then milled to create the ink. This ink is printed onto a carrier (like heat transfer paper) and subsequently transferred to the final material via heat press.
Temperature and Viscosity: During printing, ink viscosity is directly correlated with heating temperature. These variables must be strictly controlled. Industry practice shows that when heating temperatures range between 60°C and 100°C to melt the ink, an optimal and stable ink viscosity is around 0.6 Pa·s. The closer the ink is to this state, the better the transfer performance. With recent technological
advancements, the preservation temperature for printed materials has increased from 45°C to 60°C, significantly expanding the application scope of heat transfer printing. Furthermore, the use of transparent pigments or dyes has vastly improved the tonal effects of color prints.
3. The Transfer Medium (Carrier/Paper)
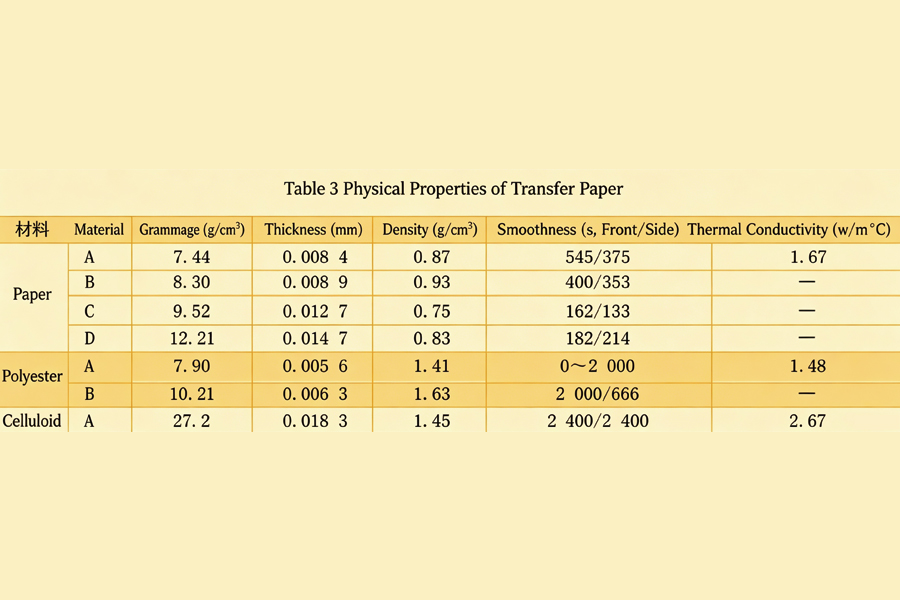
Because different packaging materials have unique properties, the following factors must be considered when selecting a transfer medium:
- Physical Properties:
- Thickness: The base material should generally not exceed 20 μm in thickness.
- Smoothness: High smoothness is required to guarantee a high ink transfer rate.
- Tensile Strength: The material must be strong enough to withstand processing and printing without tearing.
- Chemical Properties: The transfer paper must allow the ink to adhere uniformly. If the chemical properties do not support proper adhesion or if ink volume is poorly managed during production, it will result in material waste. A successful printing workflow relies entirely on mastering the chemical properties of the transfer paper.
- Thermal Properties: Because the process relies on high temperatures, the transfer paper must withstand heat without degrading. Excellent thermal properties are defined by:
- Thermal Resistance: Thinner materials with lower thermal resistance yield better heat conductivity.
- Surface Smoothness: Smoother surfaces lower thermal resistance, improving overall thermal performance.
- Heat Tolerance: With print head temperatures frequently reaching around 300°C, the substrate’s core properties must remain stable under extreme heat.
4. The Substrate (Packaging Container)
A notable characteristic of heat transfer printing is that substrates with a very slight surface roughness often yield better print quality. A micro-rough surface indicates higher surface energy, allowing the ink from the transfer paper to anchor more effectively, resulting in superior gradation and tonal quality. However, excessive roughness will hinder proper ink transfer and negatively impact the process.
PART 3: Common Quality Defects and Troubleshooting
Below is a detailed diagnostic guide for resolving common issues encountered during the heat transfer printing process.
1. Mottling / Spotting
- Symptom: Spots or uneven patterns appear across solid printed areas.
- Root Cause: Ink viscosity is too low, incorrect doctor blade angle, insufficient drying temperature, or static electricity.
- Solution: Increase ink viscosity, adjust the doctor blade angle, raise the oven temperature, and apply an anti-static agent to the back of the film.
2. Streaking / Comet Tails
- Symptom: Comet-like streaks appear on one side of the pattern, most commonly on white ink and along the edges of the design.
- Root Cause: Large ink pigment particles, contaminated ink, high viscosity, or static electricity.
- Solution: Filter the ink and clean the doctor blade; reduce concentration. For white ink, sharpen the blade beforehand, treat the film for static, clean the gap between the blade and the cylinder thoroughly, or add an anti-static agent.
3. Poor Registration / Misalignment
- Symptom: Colors shift or do not align correctly when overlapping, leaving unintended gaps (especially over base colors).
- Root Cause: Machine precision issues/fluctuations, poor plate making, or improper trapping/scaling of the base color.
- Solution: Use a strobe light for manual registration adjustments, remake the printing plates, or adjust the artwork trapping (expanding base colors slightly) without affecting visual aesthetics.
- Hazing / Scumming
- Symptom: A foggy, hazy film of ink appears in non-image areas.
- Root Cause: The doctor blade holder is loose, or the printing cylinder surface is not clean.
- Solution: Re-adjust and tightly secure the doctor blade assembly. Clean the printing plate (use a specialized scouring powder if necessary) and install reverse air-blowing between the plate and the blade.
5. Ink Flaking / Color Dropping
- Symptom: Color layers peel or flake off in specific areas of larger patterns, commonly occurring on pre-treated films for glass or stainless steel.
- Root Cause: Poor ink adhesion on the treated film, static electricity, or an overly thick ink layer that is insufficiently dried.
- Solution: Increase the drying oven temperature and reduce printing machine speed.
6. Poor Transfer Fastness / Adhesion
- Symptom: The transferred color layer easily peels off the substrate during a standard tape test.
- Root Cause: Improper release agent or adhesive backing; specifically, a mismatch between the adhesive backing and the packaging substrate.
- Solution: Replace or reformulate the release coating. Switch to an adhesive backing chemically compatible with the specific substrate material.
7. Blocking / Reverse Sticking
- Symptom: The ink layer peels off and produces a loud noise when the film roll is being unwound.
- Root Cause: Excessive rewind tension, incomplete ink drying, overly thick labels, improper indoor temperature/humidity, static, or excessive printing speed.
- Solution: Reduce rewind tension, lower printing speed to ensure complete drying, control ambient room temperature and humidity, and pre-coat with an anti-static agent.
- Missing Dots
- Symptom: Irregular missing dots in light halftone areas (looking like unprinted specks).
- Root Cause: Poor ink transfer/ink failing to release from the cells.
- Solution: Clean the printing cylinder, utilize an Electrostatic Assist (ESA) roller, engrave deeper halftone dots, adjust doctor blade pressure, and appropriately reduce ink viscosity (if other conditions allow).
9. Orange Peel in Metallics and Pearlescents
- Symptom: Gold, silver, or pearlescent inks display an uneven, wavy “orange peel” texture over large solid areas.
- Root Cause: Metallic/pearlescent pigments have large particle sizes that fail to disperse evenly in the ink pan, causing inconsistent density.
- Solution: Thoroughly agitate the ink before printing, use an ink pump to circulate ink into the pan, install a plastic air-blowing tube over the ink pan to maintain dispersion, and lower the printing speed.
- Poor Tonal Reproduction
- Symptom: Designs with extreme tonal transitions (e.g., 15% to 100%) fail to print properly in the light highlights, lack density in the shadows, or show harsh breaks in mid-tones.
- Root Cause: The dot transition range is too wide, leading to poor ink adhesion on the film.
- Solution: Employ an Electrostatic Assist (ESA) roller, or separate the design into two distinct printing plates (one for highlights, one for shadows).
11. Low Gloss / Faded Color
- Symptom: The printed product looks faded or lacks gloss compared to the proof, particularly noticeable with silver inks.
- Root Cause: Ink viscosity is too low.
- Solution: Add fresh, undiluted raw ink to increase the viscosity to the appropriate level.
- Jagged Edges on White Text
- Symptom: Jagged, unsharp edges appear on text that requires high whiteness/opacity.
- Root Cause: Coarse ink pigments, insufficient pigment milling, or low ink viscosity.
- Solution: Mill the ink further or use additives, adjust the doctor blade angle, increase ink viscosity, and switch from electromechanically engraved cylinders to laser-engraved cylinders for sharper edge definition.
13. Uneven Pre-coating on Stainless Steel Films
(Note: When printing transfer films for stainless steel, a pre-treatment silicone coating is necessary to ensure the ink releases cleanly during transfer, especially since ink release becomes difficult at temperatures above 145°C).
- Symptom: Streaks, lines, or web-like patterns appear on the coated film.
- Root Cause: Insufficient drying temperature (leading to incomplete silicone curing) or an improper solvent ratio.
- Solution: Raise the curing oven temperature to the required fixed level.